How to use Environment Variables in Render.com
A common way to configure applications before they start up is by using environment variables.
We can define environment variables in our computers, and also in our servers, and of course they can be different in each.
That's what's interesting about them: we can define an environment variable locally for our database, which may be sqlite:///data.db. Then in our server we can define the same variable, but with a value of the ElephantSQL Database URL.
Since we are using SQLAlchemy in our application, it doesn't care whether it's connecting to SQLite or PostgreSQL. So all we have to do to use a different database is change the connection string.
Let's begin by using environment variables locally.
Using PostgreSQL locally
Since we are going to be using PostgreSQL when we deploy, it's a good idea to use PostgreSQL also locally. That's because SQLite and PostgreSQL behave a bit differently, so if we use SQLite locally and PostgreSQL in production, we may come across issues.
To work with PostgreSQL locally, you can run a PostgreSQL container using Docker, you can install PostgreSQL locally, or you can create another ElephantSQL database for local development.
I would do the last option. That way, you'll have 2 ElephantSQL databases; one for production and one for development.
How to use environment variables locally with our Flask app
First let's install psycopg2 and add it to our requirements.txt file:
flask
flask-smorest
python-dotenv
sqlalchemy
flask-sqlalchemy
flask-jwt-extended
passlib
flask-migrate
gunicorn
psycopg2
Then, let's create a new file called .env. In this file, we can store any environment variables we want. We can then "load" these variables when we start the app.
DATABASE_URL=postgresql://YOUR_DEVELOPMENT_URL
The ElephantSQL URL starts with postgres://.... Make sure to change it so it starts with postgresql://...!
With the file created, we can load it when we start our Flask app:
import os
from flask import Flask, jsonify
from flask_smorest import Api
from flask_jwt_extended import JWTManager
from dotenv import load_dotenv

from db import db
from blocklist import BLOCKLIST

from resources.user import blp as UserBlueprint
from resources.item import blp as ItemBlueprint
from resources.store import blp as StoreBlueprint
from resources.tag import blp as TagBlueprint


def create_app(db_url=None):
    app = Flask(__name__)
    load_dotenv()
    app.config["API_TITLE"] = "Stores REST API"
    app.config["API_VERSION"] = "v1"
    app.config["OPENAPI_VERSION"] = "3.0.3"
    app.config["OPENAPI_URL_PREFIX"] = "/"
    app.config["OPENAPI_SWAGGER_UI_PATH"] = "/swagger-ui"
    app.config[
        "OPENAPI_SWAGGER_UI_URL"
    ] = "https://cdn.jsdelivr.net/npm/swagger-ui-dist/"
    app.config["SQLALCHEMY_DATABASE_URI"] = db_url or os.getenv("DATABASE_URL", "sqlite:///data.db")
    app.config["SQLALCHEMY_TRACK_MODIFICATIONS"] = False
    app.config["PROPAGATE_EXCEPTIONS"] = True
    db.init_app(app)
    api = Api(app)
Highlighted are four lines which we must change.
- First we
import os. We'll need this to access environment variables. - Second, we import the
load_dotenvfunction, which we'll need to run in order to turn the contents of the.envfile into environment variables. - We actually run the
load_dotenvfunction. - We'll use
db_urlif provided, otherwise we'll retrieve the environment variable's value. If there is no environment value, the default will be"sqlite:///data.db".
Notice that our Flask app has two ways to be configured: with the db_url argument, or via environment variables. You would normally use db_url when writing automated tests for your application. While we don't do that in this course, it's a good habit to get into!
Do not include your .env file in your GitHub repository! Add it to .gitignore so you don't include it accidentally.
Since we can't include .env in our GitHub repository, we should do something to make sure that new developers know that they should create a .env file when they clone the repository.
We normally do this by creating a file called .env.example. This file should only contain the environment variable definitions, but not the values:
DATABASE_URL=
You should add .env.example to your repository.
Changes needed to our app code for PostgreSQL
We've been working with SQLite all this time, and PostgreSQL behaves a bit differently. There are a couple of changes we need to make to our app at this point:
- Make sure all foreign keys are the same data type as the primary keys they reference.
- Change the length constraint on user passwords from
80to256.
This is because SQLite doesn't enforce either of these constraints, so although they were a problem before, we didn't know because SQLite didn't tell us about it. PostgreSQL will complain!
Changes to foreign keys
The only foreign key that was mistakenly given the wrong data type was in the TagModel. This is the necessary change:
from db import db


class TagModel(db.Model):
    __tablename__ = "tags"

    id = db.Column(db.Integer, primary_key=True)
    name = db.Column(db.String(80), unique=False, nullable=False)
    store_id = db.Column(db.Integer, db.ForeignKey("stores.id"), nullable=False)

    store = db.relationship("StoreModel", back_populates="tags")
    items = db.relationship("ItemModel", back_populates="tags", secondary="items_tags")
We also need to change the database migration file that creates the store ID:
...

op.create_table('tags',
    sa.Column('id', sa.Integer(), nullable=False),
    sa.Column('name', sa.String(length=80), nullable=False),
    sa.Column('store_id', sa.Integer(), nullable=False),
    sa.ForeignKeyConstraint(['store_id'], ['stores.id'], ),
    sa.PrimaryKeyConstraint('id'),
    sa.UniqueConstraint('name')
    )

...
Now, let's run the migrations so that our development ElephantSQL database is created. Remember to make sure that your development ElephantSQL database is empty before starting the migrations.
flask db upgrade
Changes to password length
In the UserModel, we'll make this change:
from db import db


class UserModel(db.Model):
    __tablename__ = "users"

    id = db.Column(db.Integer, primary_key=True)
    username = db.Column(db.String(80), unique=True, nullable=False)
    password = db.Column(db.String(256), nullable=False)
Running our migration with string length changes
Now we want to create a new migration so that our changes to the UserModel will be applied:
flask db migrate
This may add a couple other data type changes, such as changing REAL to Float. This is due to how types are assigned differently between SQLite and PostgreSQL. Make sure that the password length change is in the migration:
op.alter_column('users', 'password',
    existing_type=sa.VARCHAR(length=80),
    type_=sa.String(length=256),
    existing_nullable=False)
Running database migrations in production
So we've created our migration files and we've migrated our development database. What about our production database?
We could simply change our .env file, connect to production, and migrate that database. But then we'd need to remember to do that every time before we deploy, and it simply isn't feasible.
Instead, we want a solution where the database migrations run before the app starts. That way, it will be impossible for us to forget to run the migrations when we deploy.
To do so, we'll tell the Docker container to run the database migrations before starting the gunicorn process. It's more straightforward than it sounds!
First let's write a very short bash script that runs the migrations, and then starts the gunicorn process:
#!/bin/sh

flask db upgrade

exec gunicorn --bind 0.0.0.0:80 "app:create_app()"
Then, let's modify our Dockerfile to use that script:
FROM python:3.10
WORKDIR /app
COPY requirements.txt .
RUN pip install --no-cache-dir --upgrade -r requirements.txt
COPY . .
CMD ["/bin/bash", "docker-entrypoint.sh"]
If you want to run the Docker container locally with the Flask development server, our previous instructions are still good. You won't be applying the migrations, but most of the time that won't be a problem.
Commit the changes, and push them to GitHub. We'll need these changes so we can use environment variables in Render.com.
How to add environment variables to Render.com
Now that our Flask app is using environment variables, all we have to do is add the DATABASE_URL environment variable to our Render.com service, and then deploy the latest changes from our GitHub repository.
To add environment variables in Render.com, go to the service settings and then on the left you'll see "Environment":
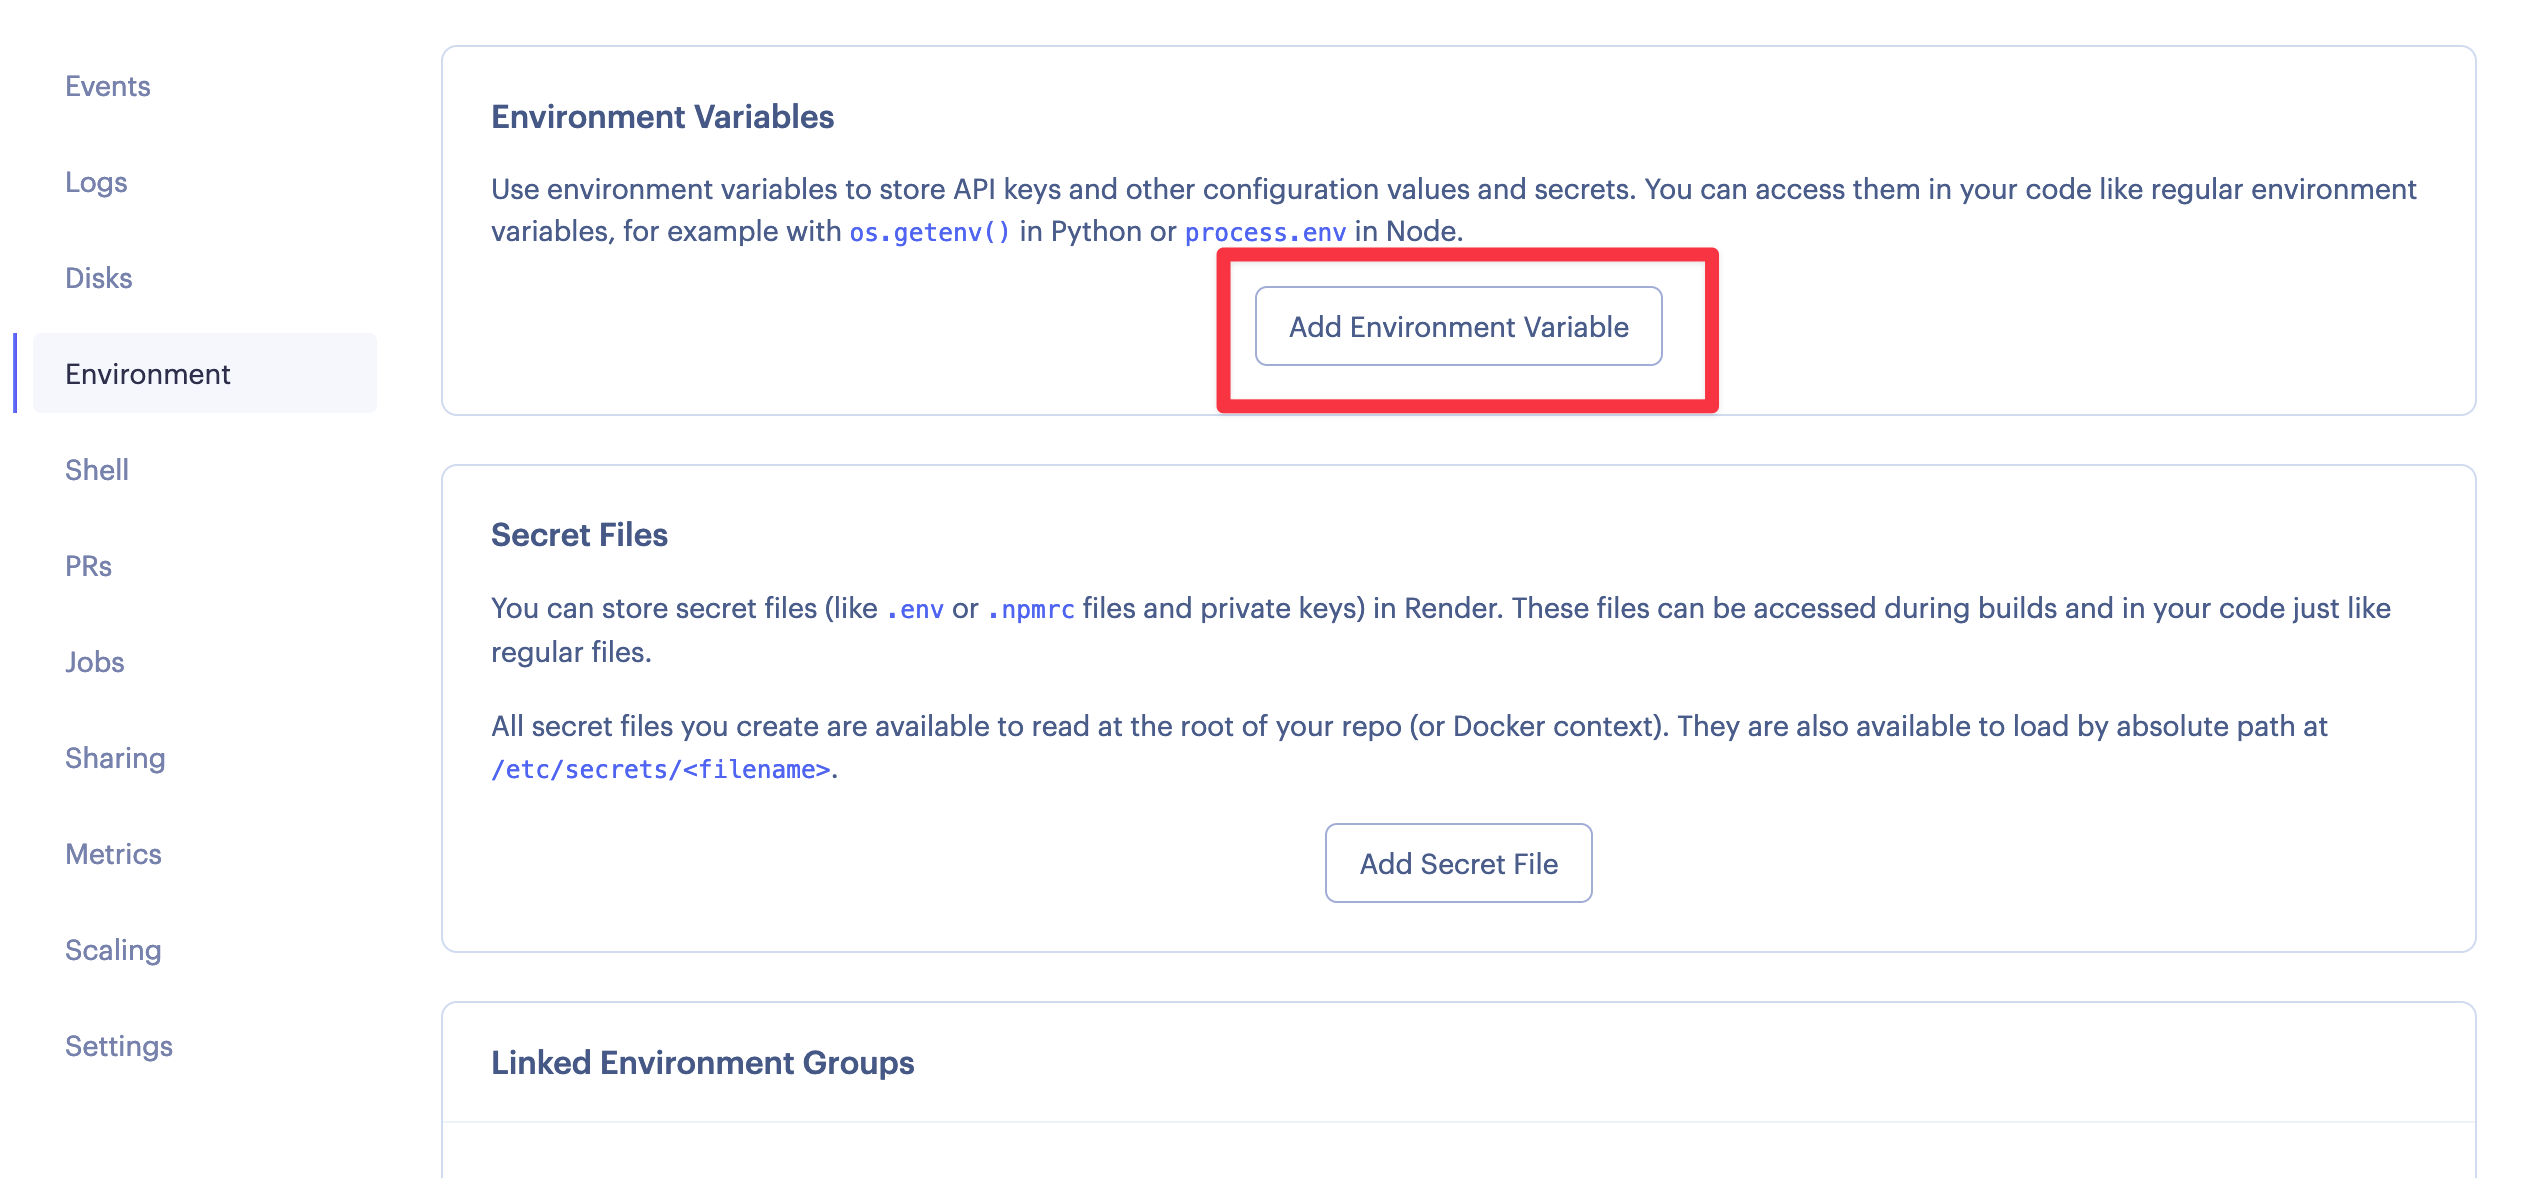
Click on "Add Environment Variable", and there put DATABASE_URL as the key, and your ElephantSQL Database URL as the value:
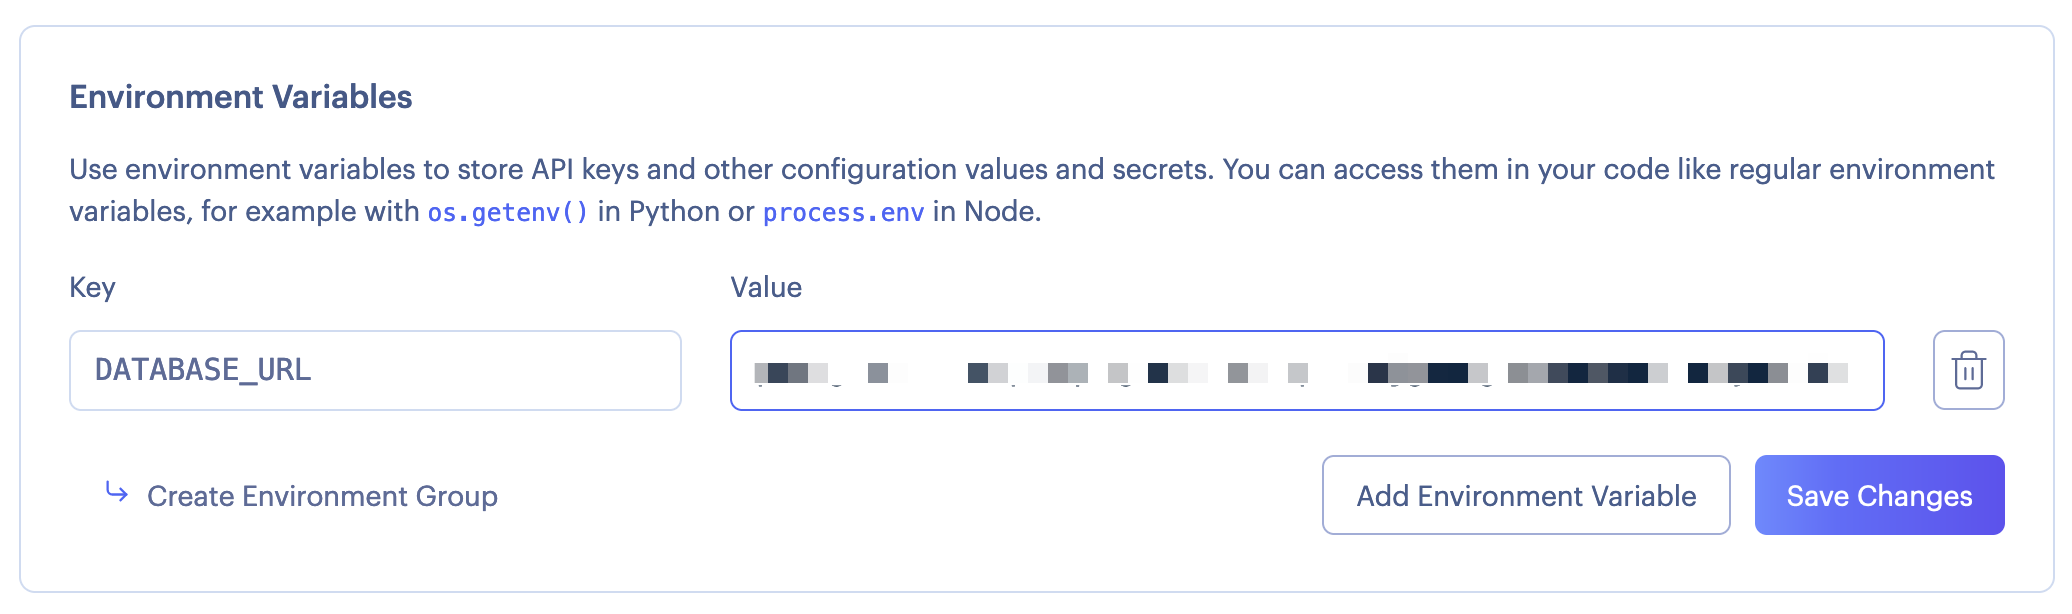
Again, make sure to use postgresql://... here.
Now, do another manual deploy of the latest commit.
When this is done, your app should be saving to the ElephantSQL database, and it will apply the migrations before starting up!