Request chaining with Insomnia
Up until now, we've been able to log in, get an access token, and then use that acces token to access the protected endpoints in our API. However, this workflow is a bit tedious, and we have to copy-paste the access token into every request. Luckily, Insomnia has a feature called request chaining that allows us to simplify this workflow!
How to use request chaining with Insomnia
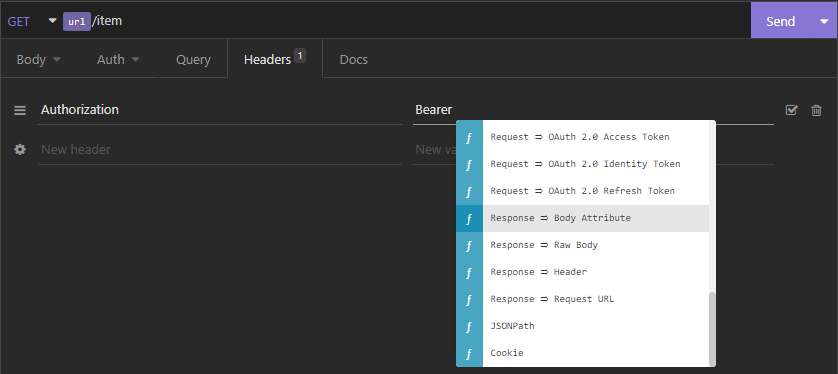
Instead of passing the JWT in every request, you can access the Headers section and follow these steps. In the Authorization field, type Bearer add a space and then press CTRL + SPACE to get a contextual menu. Navigate to the Response -> Body Attribute field and select it, as shown in the screenshot below:
After you've selected it, you'll see an error that looks like this:

If you click on the error, you'll see a modal window:
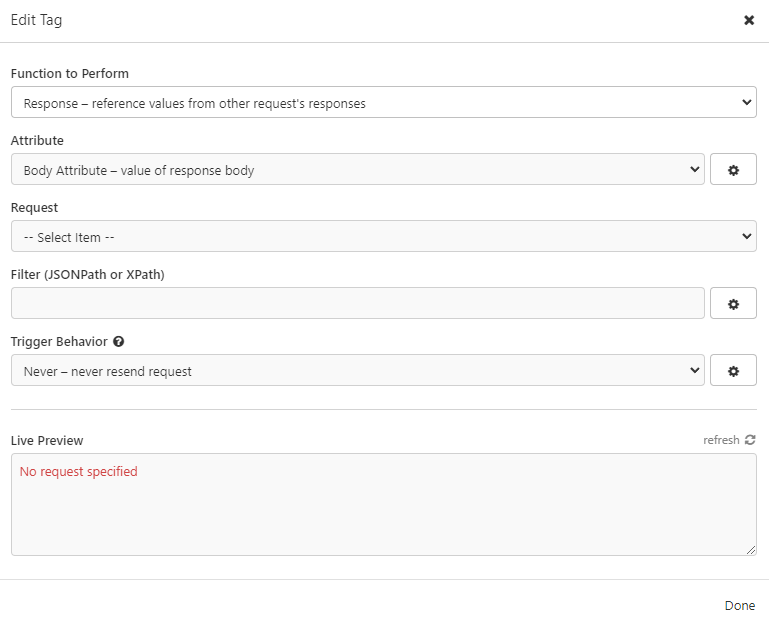
Inside of this window, you will first need to select a request that you want to get the data from. Click on Select item inside the Request field and choose the POST /login endpoint. After you've done that, go to the Filter field. In this field, we are telling Insomnia which part of the response we want to get from it. The prompt is started with the dollar sign $ and then we can use the dot to access the attributes of the response. If we only type $ or $., we'll get a list of all the attributes of the response:

In our case, we want to get the access_token attribute from the response, so we type $.access_token. If there was something else inside the access_token that you wanted to access like some value for example, you could do $.access_token.value and so on. After you've added the filter, you can set the Trigger Behavior. For example, you can set it to When expired and set time to 300 seconds. This means that the token will be refreshed every 5 minutes. The filled out window should look like this:

You can now press Done and you'll see that the error is gone and that the Authorization field is filled out with the Bearer token:

Since we use multiple protected endpoints, we would need to use the same method to get the access_token for every request. To tackle this problem, we can use environment variables, as we did before for the url variable.
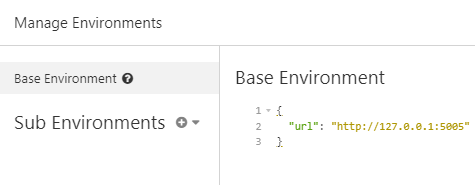
To do this, you need to create a new environment variable. Click on the No Environment button in the top left corner of the Insomnia window and then click on the Manage Environments button, you will see a base environment that looks like this:
Add a new environment variable called access_token, and for its value you should follow the same process from above. As a quick reminder, you should press CTRL + SPACE to get the contextual menu and then select the Response -> Body Attribute field. Click on the error that will show up and fill out the modal window as we've done before. Make sure to wrap the Response -> Body Attribute with quotation marks, as shown in the screenshot. When the variable is created, your environment should look like this:

You will now be able to use this environment variable in all of the endpoints by simply writing {{access_token}} in the field that you want to use it in. Coming back to the first example, you can use the access token in the Authorization field by writing Bearer {{access_token}} and this will be the result:

If you try and make the request, you will see that it works just like before, without needing to copy and paste the access token.